

Following the same theme as my previous permaculture articles on blueberry beds and living fences, I’m going to provide some reasonably copious notes on my current process of constructing modified hügelkultur mounds for our fruit tree orchard. It will not include my efforts on the mini-gardens in between each tree (i.e. either in-row or between rows), nor will it include detailed information on the tree cultivars and rootstocks. However, this time around I will embed some accompanying images to serve as layman’s helpers. Hopefully my efforts will serve the reader well enough to facilitate the printing of a how-to guide.
Please keep in mind that the orchard site itself is so dynamic, and the topography so intensely variable, that I’ll have to present the average fruit tree mound as the “standard of measure”. I am also making the assumption that the reader is familiar enough with both permaculture and hügelkultur methods of sustainable farming that I can eschew the freshman level college courses and jump right into a senior syllabus, if you will. Even so, I’ll touch on the companion planting guilds for my pear, peach, plum, and apple trees.
Overview
I imagine the first question the reader would like answered is, “Why build mounds for fruit trees?” In my situation, the reasons are several. A couple of the reasons (enumerated below) require more detailed explanation, while others will be addressed in the description of the actual mound construction.
- Poorly draining soil due to heavy clay (encourages Phytophthora root and/or crown rot)
- Shallow depth to bedrock
- Highly alkaline cedar glade (see this chart for ideal pH of various fruiting species)
- Vastly increased surface area on which to plant a tree guild
- Increased water retention
- No mechanical damage to irrigation lines and emitters
- Easier maintenance (weeding, harvesting, planting)
First, the ideal depth to bedrock varies primarily on the rootstock, but also on soil conditions, climate, precipitation, and so on. Standard and semi-standard sized rootstocks inherently increase vigor, so they necessarily take advantage of deeper soil. These “traditionally rooted” trees are what we fondly recollect from the old homesteads of 150 years ago. Even so, please refer to this 1916 report from the Utah Agricultural Experiment Station to see that most of the root systems of the trees of study still lay within the top 2.5’, but ultimately a few extended to depths approaching 5-9’.
High density, dwarfing rootstocks – the standard in the orchard industry today – require far less soil depth and generally require permanent staking. That is, the trees aren’t meant to be productive for more than, perhaps, a decade or so. Based on my anecdotal experimentation, they typically magnify the “run” (horizontal spread) more than the “dig” (vertical spread) over a shorter period of time, and to depths no greater than 2’, hence the stakes and/or trellises. (In my not so humble opinion, it’s Franken Orcharding meant to generate a considerable sum of money while simultaneously strip mining the soil. If you’ve never visited a commercial orchard, envision never ending rows of twiggy-looking apple scarecrows that reach heights of highbush blueberries. But I digress.)
Our orchard is planted in a semi-dwarf, semi-traditional format. Without going into the nitty gritty of semi-dwarf rootstocks, suffice it to say that anywhere from 95-100% of the root system is contained within the top 3’ (90-100 cm) of soil. See page 14, slide 85 of this presentation given by Mississippi State University’s Horticultural Department for a good visualization, and this research publication authored by Cristian Paltineanu at Romania’s National Research and Development Institute for Soil Science, Agrochemistry and Environmental Protection. The latter research particularly applies to my westerly sloping orchard.
Second, it is widely known that organic content naturally increases soil tilth while also increasing water retention. Consider. If the permaculture farmer increases his soil’s organic content by just 1% over 1 acre, he will have enabled his soil to retain an extra 20,000 gallons of water. That is tremendous, in that you’d have less runoff, less erosion, less wood chips and logs headed to the landfill, and less irrigation requirements. To say that my orchard is a biodegradable dumping ground would be the understatement of the year.
Mound Construction
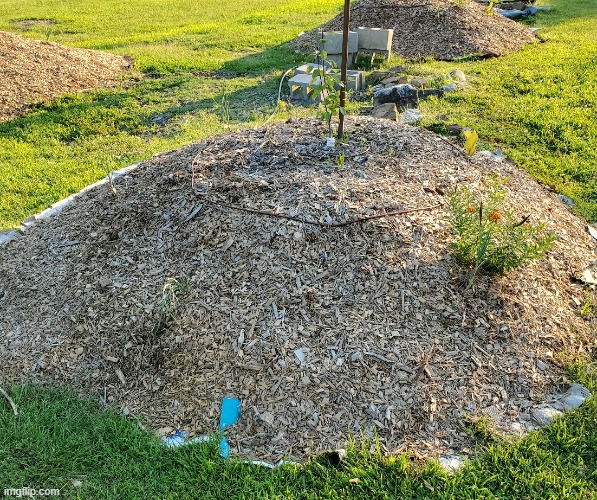
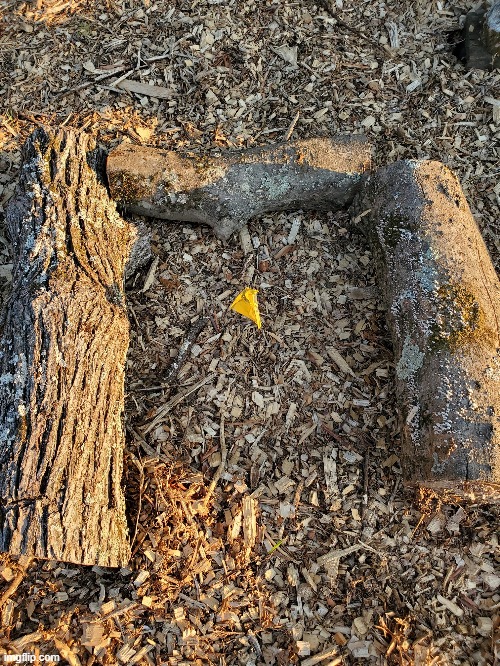
On average, each of my fruit tree mounds is 10’ in diameter x 2’ high, with a plateaued apex around 3’ in diameter (see Figure A). Before construction, I measure the distances between trees and rows (15’ and 20’, respectively), and use yellow flags like these (purchasable in unicolor, 10 flag bundles at Lowe’s) to mark the centroid. I then measure about 2’ square from the centroid, which allows me to lay three sides of the square with logs (see Figure B). Note that the fourth side – the side at the lowest point of the mound – is left open, so as to facilitate drainage.
My personal preference is to choose hardwood logs around 12” or greater in diameter, and ones that are fresh if possible. However, logs of any age or diameter will do fine; one would just have to be more conscientious when one adds the topsoil. The reasoning here is that the more freshly cut they are, the longer they will be around to store water reserves and slowly release their nutrients – 10-20 years, depending on the type of wood. (Indeed, I have found that aged mounds appear to store about three weeks’ worth of water needs for young trees.) Any soil within ⅛” – ¼” will be nitrogen-starved due to the decomposition process. It is for this very reason that I provide a 2’ cushion between each log and the centroid, which is the ultimate planting site of the fruit tree. An important note here is that one never, ever wants to plant a permanent fixture directly on top of a rotting log. Think about it. Hügelkultur is ideally suited to serve annual and perennial plantings. Planting a tree on a mound that constantly shifts is going to cause heartbreak down the road.
Now that the easiest part is done, it’s time to fill up the entire area between the logs with good topsoil and overflow it about 6”, for an approximate total of 18” depth within the center of the mound. One could even use fully (key word: fully) composted horse manure if desired; I have done so with no adverse effects. I tamp it down by foot so that it’s firm but not “walking trail compacted”. There’s no point in fretting about the final depth yet, because I rework it once Billy Gibbons, my neighbor, has dumped a solid 3 yds.3 of wood chips over the entire 10’ diameter circle, with extra as needed.
Next, I compact (by foot) the wood chips around the entire perimeter of the mound (i.e. outside and on top of the logs) and attempt to get a slope of about 30-40%, but never to exceed 45% for the purposes of erosion. (It will ultimately be immaterial what the slope is for two sides of the mound, as I eventually fill these with 12-18” of wood chips for future cultivation between each tree. But that is left for a future installment as time permits.) At this point I dig out any mulch within the 2’ square around the planting site and toss it around the mound so as to make it symmetrical and “pretty”.
This is about the time when I plant a bare root fruit tree on semi-dwarf rootstock. Its root system has been pruned to such a degree that all of its roots should comfortably rest on top of, or lightly buried in (perhaps 2”), the previously prepared topsoil. Then I fill in the area with more rich topsoil (again, lightly compacted by foot, and fully burying the tree roots in 5” of soil or thereabouts), and about a 1” layer of wood chips for the purposes of water retention and weed inhibition.
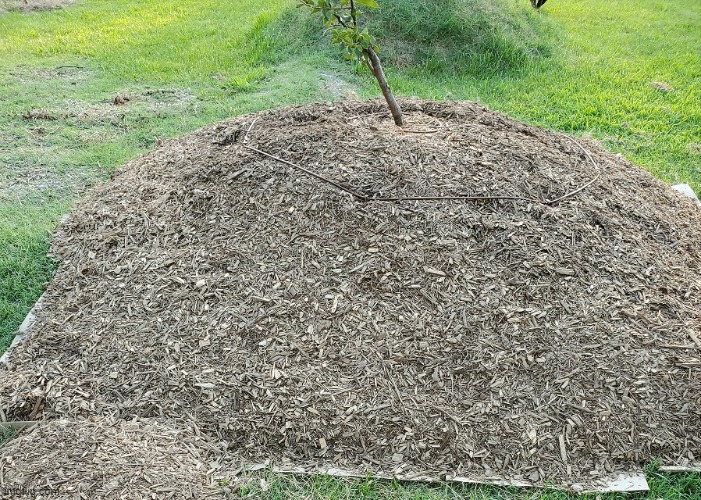
Most importantly, I always ensure the graft union is 2” above the soil line, and there’s approximately 4’ x 4’ x 2’ of topsoil in which the tree can immediately establish. Matt Moser recommends 3-4” above ground, which is perfectly fine. I tend to prefer a larger semi-dwarf tree than most orchardists, and the less of the rootstock that is exposed to the sun, the larger the tree will be. (See Hrotko and Magyar’s excellent explanation of auxin transport loss and decomposition due to solar radiation exposure.) When all is said and done, I should have a mound that resembles Figure C, a newly reconstructed mound during the Second Bermuda Grass War, where its height is actually around 2.5’.
Companion Planting
Planting the tree guild is arguably the most fun for me. The process of husbandry really seems to “bond” me to the tree, such that you develop a nurturing relationship with it. If the reader is unfamiliar with the concept of fruit tree guilds, please read this introduction to companion planting, courtesy of Walden Labs. They also link to a very handy chart that provides a good matrix for gardeners and orchardists to reference. I personally prefer their presentation to that of Wikipedia because it presents the basic logic behind a food forest. Yet more crucial information to digest is available at Regenerative’s 7 parts of an apple tree guild.
Until the mound is aged enough to provide the necessary water requirements for the tree guild, it’ll have to be irrigated. Without going into extraneous details on my setup (again, that would have to be a future article), I’ve chosen to use ¾” HDPE tubing as my trunk lines, available at any decent irrigation supply store. I purchased my tubing in 250’ and 500’ rolls at The Drip Store and Drip Depot. Once in place, each mound then receives two drip emitter lassos: One for the tree, and one for the companion plants. The tree lasso consists of ¼” drip line at 6” spacing, with each lasso consisting of 8-9 emitters. The guild lasso consists of ¼” drip line at 9” spacing with 22-23 emitters. Figure A provides a pretty good visual as to how they are configured once hooked into the trunk lines.
Last but not least, please see below for a breakdown of my tree guilds for apple, peach, pear, and plum, along with some brief notes. Hopefully all of the information in this article will provide a good starting point for a permaculture orchard!
- Accumulators and Mulchers
- Bocking 14 Russian Comfrey (Symphytum x uplandicum) – purchased at local nursery; thinner stalks than Bocking 4, hence it decomposes more readily; does not reseed; attracts bees
- True Comfrey (Symphytum officinale) – purchased at Grower’s Exchange; dual use medicinally; reseeds aggressively; attracts bees
- Attractors
- Butterfly Weed (Asclepias tuberosa) – purchased at local nursery; attracts bees and Monarchs
- Catnip (Nepeta cataria) – provided by Billy Gibbons’ wife; repels Japanese beetles, aphids, and ants; attracts cats (mine), parasitic wasps
- Chives (Allium schoenoprasum ‘Staro’) – purchased at local nursery; prevents apple scab; repels Japanese beetles, aphids, mites, and nematodes; attracts bees; tasty
- Common Yarrow (Achillea millefolium) – provided by Billy Gibbons’ wife; attracts lacewings, lady bugs, butterflies; dual use medicinally
- Greek Oregano (Origanum vulgare var. hirtum) – purchased at local Lowe’s; attracts hoverflies
- Lemon Balm (Melissa officianalis) – provided by Billy Gibbons’ wife; deters mosquitoes; attracts bees, parasitic wasps; dual use medicinally
- Nitrogen Fixers
- Crimson Clover (Trifolium incarnatum) – purchased at Sustainable Seed Company; annual; gorgeous when in bloom
- New Zealand White Clover (Trifolium repens) – purchased at Johnny’s Selected Seeds and Sustainable Seed Company; perennial; attracts bees; drought tolerant
- Repellers
- Catnip – see above
- Chives – see above
- Daffodil (Narcissus sp.) – purchased at Brent and Becky’s Bulbs and Bluestone Perennials, numerous varieties; repels deer, rabbits, and voles
- Garlic (Allium sativum var. sativum) – purchased at Filaree Garlic Farm, numerous softneck varieties; repels beetles, wooly apple aphids, and peach tree borer; very tasty
- Lemon Balm – see above
- Weed Suppressors
- Catnip – see above
- Greek Oregano – see above
- Horseradish ‘Big Top’ (Armoracia rusticana) – purchased at Nourse Farms; prevents brown rot and powdery mildew
- Lemon Balm – see above
- Strawberry (Fragaria × ananassa) – purchased at McKay Nursery, Red Chief and Surecrop varieties


Billy Gibbons … (laughs)
Some of us know that name from back in the day of sowing wild oats.
Had the greatest of good fortune to go and see that Billy Gibbons way back in early 1973. Stood at what would be considered today’s social distancing , with he being about three feet higher than myself as he was standing at the edge of the stage, and heard him play the opening of my all time favorite rock song “Just Got Paid”.
It sure was great to be an eighteen year old Southern boy back in the 1970s.
hmm, i can’t seem to get photos to upload. Just trying to show our first hugelbeet attempt.
we trenched an area approx 9′ x 3′ x 12″ deep (removed sod, topsoil layer down to clay), filled the trench with 5 basically dead oak logs that were about 16″ dia , and varied in length from 5′ to 3′. Smaller scandinavian maple logs made up the remainder of the base “pyramid”.
filled gaps with wood chips, soaked completely with water, topped with all the cut grass I could get, then mounded with a crapload of big sticks, leaves, dirt, topped it all with patches and rolls of sod/sod side down, topped all with good topsoil.
Mound ended up about 5′ tall, 10′ long, 4′ wide, then i topped with straw to help stop rain erosion. It’s created a surprisingly large planting area.
We’ve planted sunflowers, potatoes, cucumbers, zinnias, and I’m getting ready to plant some late/quick maturing watermelon and maybe more sunflowers as space permits.
This mound is in close proximity (5′)to a georgia belle (i believe) peach tree: slightly uphill from it.
I’m looking forward to another chip drop soon, and if good logs are included, I’ll most likely build another mound with the more careful and detailed instructions you’ve included, but in the end using what we’ve got.
If you’re talking about “that” Billy Gibbons, please ask him if he’s got a telecaster in his collection that he wouldn’t mind parting with cheap for a fan/lover of tele’s. I’m not kidding.
I really appreciate these articles you’re putting up. The info is intense. It’s easy to see you’ve done your homework and enjoy this. thanks!!
Oh dude, the vastly increased planting area is just incredible. Assuming one adheres to a reasonable, minimally erosive slope, one could plant an entire small garden on one fruit tree mound. With your setup, you won’t have to water after 3 or so years if I had to guess. Those logs will store a lot of water.
This is how the Cherokee often did it in Appalachia, how the residents of the Caucasus did it, etc. The only way forward is to go backward. Our food supply system is so screwed up in this country.
Easiest way to upload images is to use https://imgflip.com, upload your photo and don’t generate any text for the “meme” image. It’ll provide you with a public URL.
Thanks for another great post. Would be great to have some pictures of the stages of construction or diagrams to go along with it.
Hmmm, I should do that the next time I build a mound. With everything else I’m rushing to get done before November, it may slip a bit in the backlog. 🙂
https://imgflip.com/i/484zuy
link to hugelbeet base image
That will be a killer garden for years and years. If we all aren’t wiped out by Tsar Bomba, I’d like to hear from you as to how long it took before you never had to water again. I’ll place bets on 3 years.
Outstanding article AoC.
I will defiantly consider some of your outstanding tips and tactics. Thanks!
The oldest of my 60 fruit and nut trees, and 22 black and blue berry mini arbors are 7.5 years old, and this is an amazingly abundant summer so far.
Many lessons learned the hard way, overall much success.
PS: The reflective bird tape has worked better than I ever dreamed (so far) on keeping birds away, and may also be freaking out the deer. Have five scarecrows I move every dusk, and the battery operated red wolf eyes, and solar motion lights.
So far almost no animal theft this season!
Regarding your log geometry, may I suggest a 3D approach? If you tilt each log say 30° along the z-axis you can overlap the ends while still allowing for radial drainage. Furthermore, this allows for incorporating more logs or adjusting the diameter similar to a camera aperture. Also radial symmetry because symmetry.
Interesting, never thought of that. Definitely worth a shot and certainly won’t hurt a dang thing because in the end, it’s all gonna be soil! Thanks!
If I showed folks how many logs I started with…well, suffice it to say that as goes one’s back, so goes one’s tree mounds. 🙂
Our Hugelkulture garden has done well. The only downside: it is a skunk magnet. The skunks love the grubs that are feasting on the decomposing Sycamore and Cottonwood logs we used. Great article!
For Northern Climates, Standard Fruit Trees are the Best Choice
This from St Lawrence Nurseries
It is the rootstock that determines the ultimate size of the tree. There are “standard,” “dwarf” and “semi-dwarf” rootstocks.“Dwarf” trees are made by grafting a cultivar onto an inherently weak rootstock, which stunts the growth of the tree. Dwarfing rootstocks were originally developed in England, where long, cool, damp growing seasons can cause apple trees to produce an excessive amount of foliage instead of producing fruit. These rootstocks were chosen precisely because they lacked normal vigor. Grafting cultivars onto such roots is like putting a tourniquet around the stem; the tree simply cannot get as many nutrients, and so does not waste energy on excessive vegetative growth.
A dwarf or semi-dwarf tree, because of its subnormal vigor, cannot put out the spurt of growth necessary to thrive in the short season of a northern climate. The result is often poor growth and equally poor fruiting, even for varieties which would otherwise do well in northern regions. In fact, dwarf and semi-dwarf trees have so little vigor that they cannot compete with sod (grass and weeds) for available nutrients.
Your standard tree might well be producing fruit for your great-grandchildren, while dwarf trees must be replanted every 10-20 years. Finally, the crop yielded by your mature standard tree will be many times greater than that of a dwarf or semi-dwarf tree. They can be kept small by annual pruning.
If that is USDA Zone 3, I could maybe see it. You wouldn’t wanna be mounding anything in that frost line unless you mitigate the heat loss with stones or something. But semi-dwarfs having so little vigor? Tell that to the folks at Cornell in Ithaca, NY. Complete nonsense just about anywhere else unless he/she (in that nursery) caveats it with a lot of data, especially if you have strong scionwood like Junaluska – and not a weak one like Honeycrisp. I only wish G-890, MM-111 and EMLA 7 agreed with the above! I’ll write an article about different rootstocks and my experiences sometime. I had a lot of fun playing with dang near most of them except the Budagovskies.
I’m certainly not opposed to seedlings or even Antonovka if you either love big trees or live in Alaska. To anyone else who doesn’t want to wait 8-10 years for their first real harvest and spend half the day pruning, I’d go with something smaller. Even MM-106 or MM-111 which are semi-standard in vigor on non-spur.
They are indeed correct about dwarfs in even semi-traditional plantings though. They’re Franken Trees outside of being planted in a Back to Eden Garden. Highly precocious at the cost of a weak root system that needs permanent staking. I won’t use them even with vigorous scions like Red Rebel. Just not my thing to have a row of trellised scarecrows 3 feet apart.
Fantastic information! Thank you, AOC. Hügelkultur has me fascinated!
Any thoughts on non chemical control of brown rot on stone fruit. I am trying the new bacillus treatments along with sulfer
I haven’t had any instances of brown rot and I just planted horseradish as a precaution based on the literature I’ve read. However, I did have a couple of instances of fire blight before I was mounding the trees. That is a bitch…I can’t think of anything worse, disease-wise. I ended up pulling those two pears out because the soil is just too darn heavy here. I’ve also had scab and CAR every year, the former of which has gotten much better (but not 100% prevented) with the mounds and companion planting, and the latter is nearly wiped out by cutting all the cedar trees down. 🙂
Wish I could say there’s a magic bullet for you, but I just stay on top of pruning for aeration and sunlight, and the mounds make drainage a non-issue. Drainage has always been key for me, especially stones, and seems to always lead to fungal issues. The peaches have been bigger pains in the asses for me than the plums.
I personally wouldn’t even use Serenade Opti because I really detest the idea of spraying Bayer bacillus on my trees. But it is apparently OMRI Listed.
Great information. We stumbled into hugelkulture about five or six years ago and it changed the way we plant. On poor soils it sets you up not only for an immediate place to plant, but leaves behind it deep loam after decomposition.
Growing food…consuming, rewarding, maddening, satisfying, providing a measure of self sufficiency, never lacking in things to learn. More dynamic even than meat cutting, and nearly as much a pleasure. 🙂